
Where Exploratory Testing Begins
Every acquaintance with a new project begins with the preparation of an exploratory document. This document may also be called a foundation, which is built to ensure convenient and structured work with a particular application. It contains several core sections that allow, at a glance, to get familiar with the specifics, the primary tasks, and the main issues of the application.
Let us walk through these sections to understand what makes up the most important preparatory stage of any exploratory testing.
1. Agenda
The first section contains all the necessary information about:
- where to find the application (links to Google Drive, links to the program in the stores);
- how to work with the application (guides, documents, scenarios);
- where to test the application (test environments, bug trackers);
- other details and hints (cheats, passwords, keys, accounts).
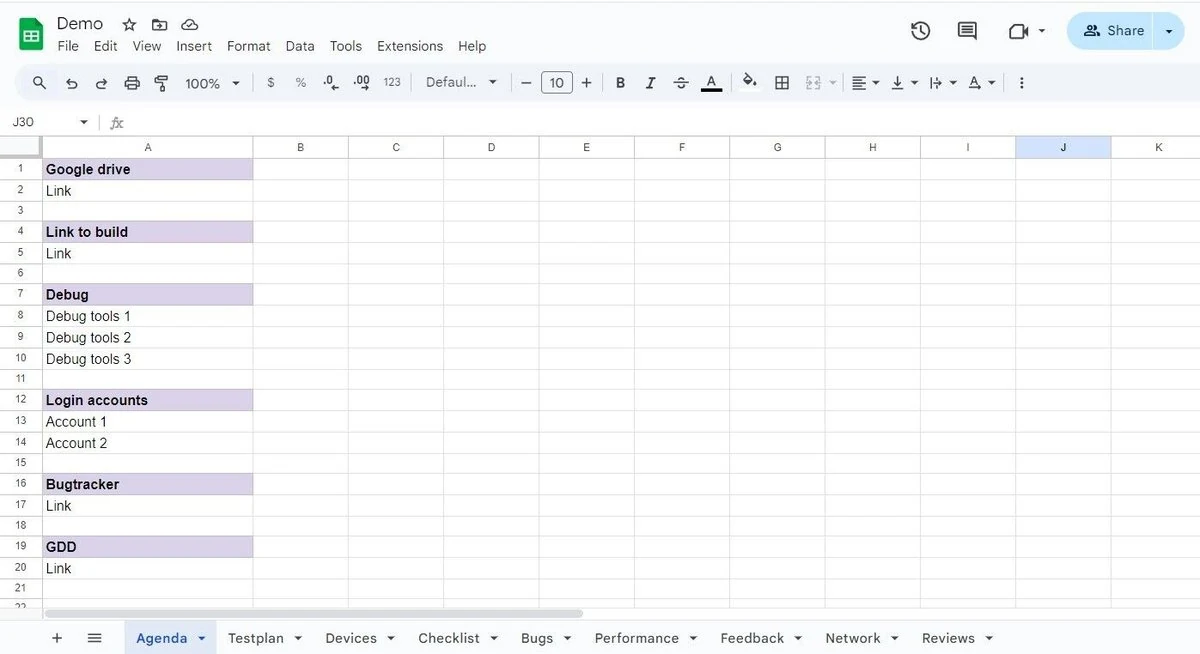
This part of the document is the starting point for every tester who opens the project for the first time. If designed correctly, the Agenda saves time, avoids confusion, and provides a clear roadmap for accessing the product and the tools surrounding it.
2. Testplan
Another obligatory element is the preparation of a test plan.
This includes the following tasks:
- Defining project tasks (documentation creation, performance testing, exploratory testing, network testing);
- Determining the timelines to be spent on the work (exact dates or hours);
- Distributing responsibilities among testers (who will take on which task).
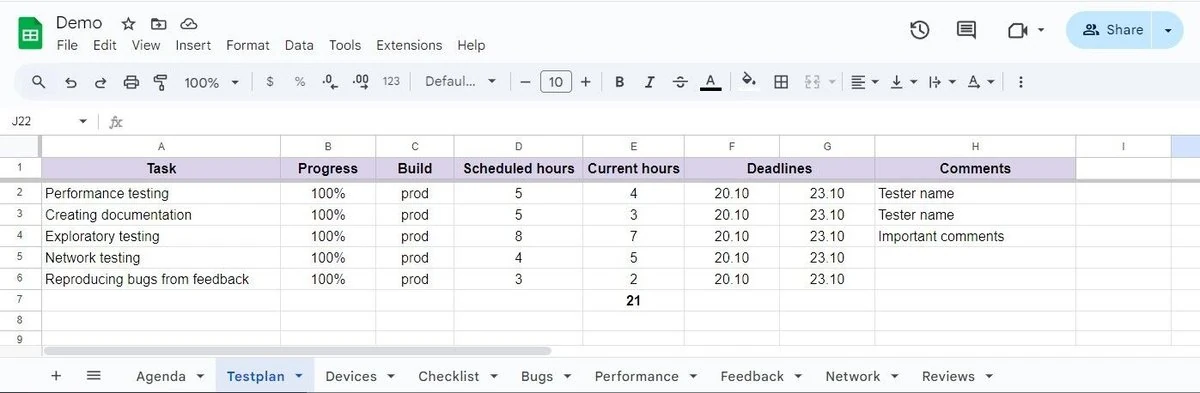
The purpose of the Testplan is to break down the project into manageable parts and organize all the top-priority tasks, assigning responsibilities and estimated completion times. In this way, everyone involved understands what is expected, what deadlines exist, and what must be done.
Thus, the Testplan allows testers to structure the project into clear steps, lay out responsibilities, and track progress effectively.
3. Devices
Next, it is necessary to determine which devices will be used for testing. First, list all devices available in the company’s device library. Then, within this list, highlight different devices for the testing tasks.
These may include tablets or smartphones that vary in technical specifications, OS versions, firmware, screen resolutions, screen sizes, and operating systems. The broader and more varied this list is, the more comprehensive the application testing will be.
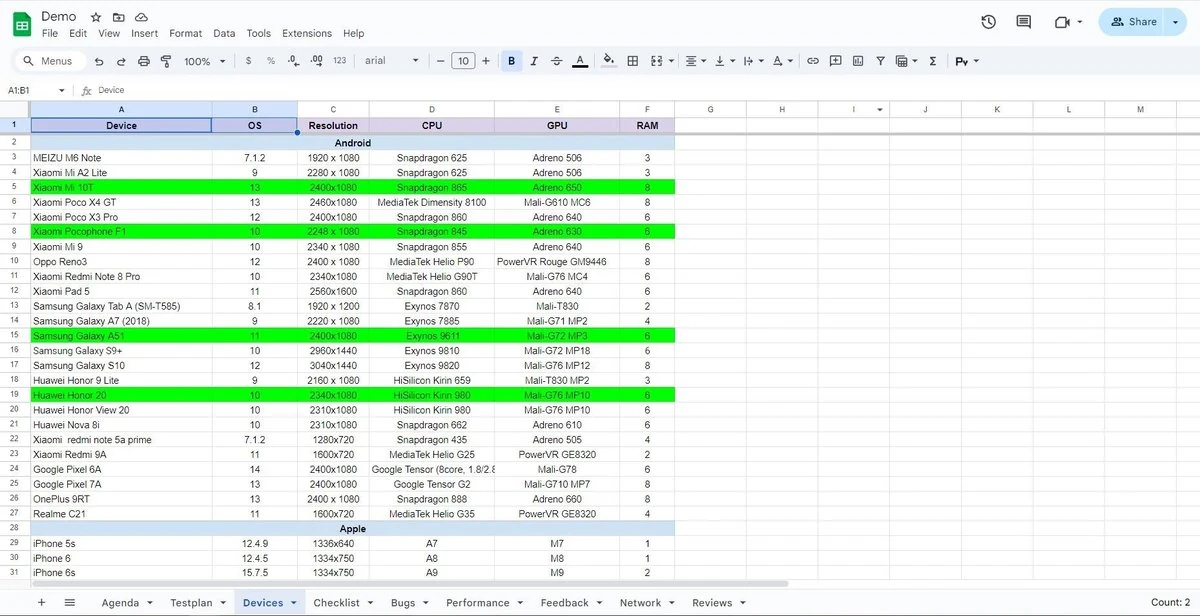
The Devices section not only helps define which devices will be used as testing tools but also serves to identify the weak spots of the application later, based on the characteristics of the chosen models.
4. Checklist
Another crucial step is the preparation of a checklist.
A checklist in testing is a structured list containing a set of checks for the application’s functionality. During testing, serious details can sometimes be overlooked, which means missing bugs and incomplete coverage.
The most convenient approach is to divide the checklist by mechanics: lobby, tutorial, gameplay, settings, etc. This allows testers to orient themselves within the app more easily. The checklist should preferably be formatted in a unified style. For example, either use only verbs (“collect,” “add,” “expand”) or only nouns (“collection,” “addition,” “expansion”).
Once the checklist is created, the tester begins verifying items according to the list. If, for some reason, an item cannot be completed, the tester should add a comment explaining the reason (requires long playthrough, cheats needed, test payments not connected, etc.).
If the check is successful, statuses are marked: “passed,” “failed,” “blocked,” “skipped,” or highlighted with corresponding colors (e.g., green for success, pink for failure). For convenience, the tester can also note the bug ID number, which will later be described in the “Bugs” section.
A checklist should not be excessively large. It must include only positive scenarios that allow covering the main functionality of the application as efficiently as possible without wasting excessive time. Reference to the GDD (Game Design Document) can help identify which areas of the app are most important to check.
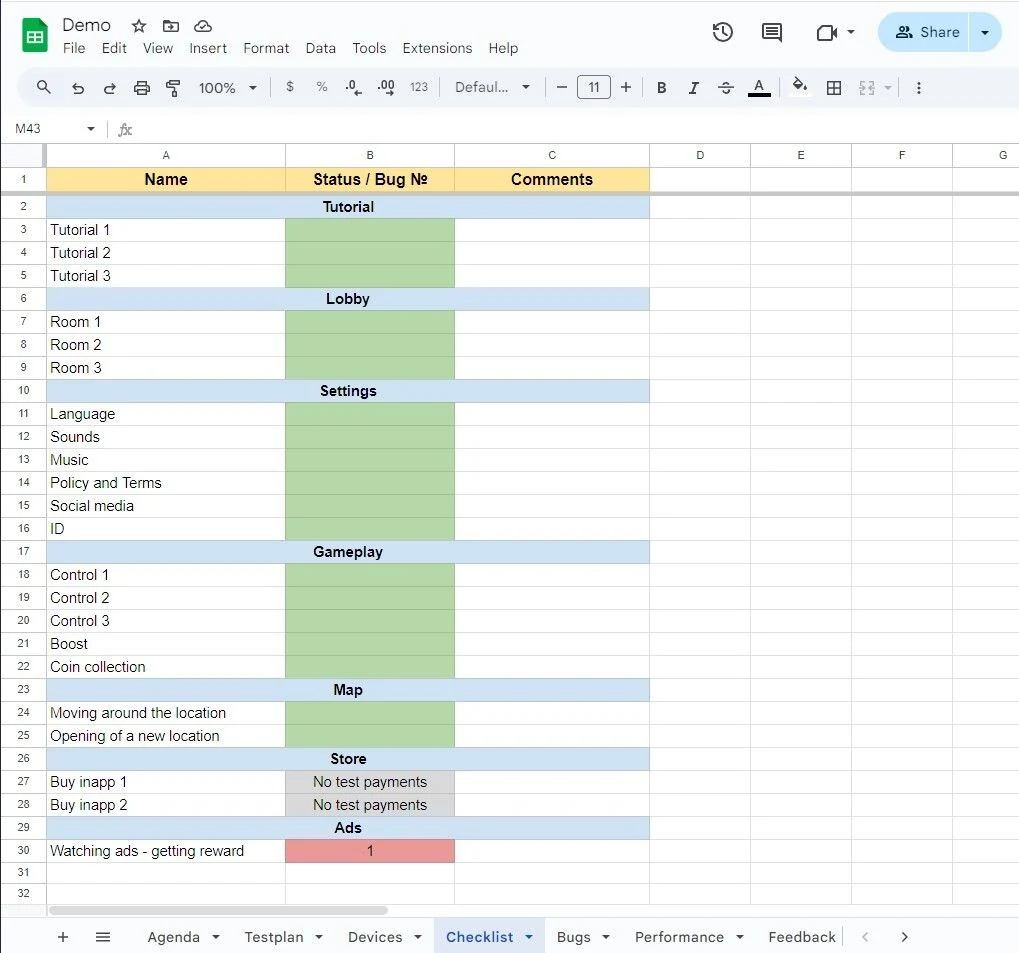
In conclusion, the preparation of a checklist is one of the most responsible steps in preparing for exploratory testing. It not only shows the work progress but also prevents forgetting about important checks.
5. Bugs
The main task of a tester is to find bugs or errors that interfere with the correct operation of the application. Users always have expectations of how the program should work. But expectations and reality do not always align. That is why testing exists - to find as many discrepancies as possible before the release.
When a tester encounters a bug, it must be documented (reported).
Bug reporting usually follows a standard scheme:
- ID number: every bug receives a number for convenience. This also allows linking bug IDs back to the checklist.
- Title: the bug should be described concisely but clearly, usually specifying the problem and the context. For example: “Inventory does not open in the lobby.”
- Platform: Android, iOS, PC.
- Priority: Low, Mid, High, Critical, Blocker.
- Status: Open, Fix Ready, Closed, Not Reproducible, Not a Bug, Needs Rework.
- Steps to reproduce: written as clearly and unambiguously as possible so any tester or developer can reproduce the issue.
- Result: describe the actual result and the expected result. What was supposed to happen, and what actually happened.
- Files: attach screenshots, logs, or videos.
- Comments: often used by developers to note what caused the issue, whether it is indeed a bug, and whether it will be fixed. Testers may also leave remarks here.
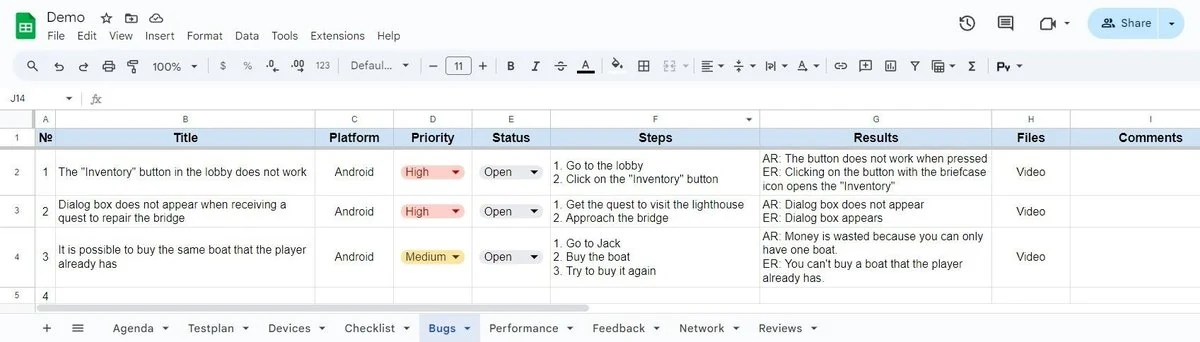
Thus, the Bugs section is a kind of detailed report that not only helps fix existing issues but also highlights the weakest points of the app.
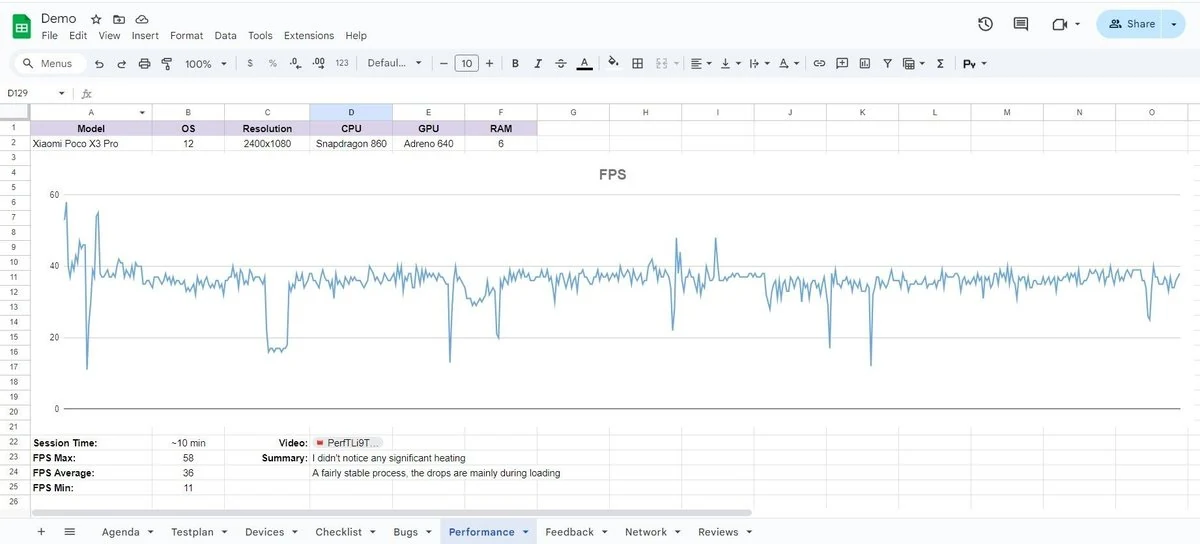
6. Performance
Performance testing is a method of determining whether the application is optimized well enough.
- For mobile applications: FPS is measured. Typically, a 10-minute FPS test is performed (unless longer testing is required). A graph is created to show FPS drops, minimum, maximum, and average values. Session duration and current app settings are also noted.
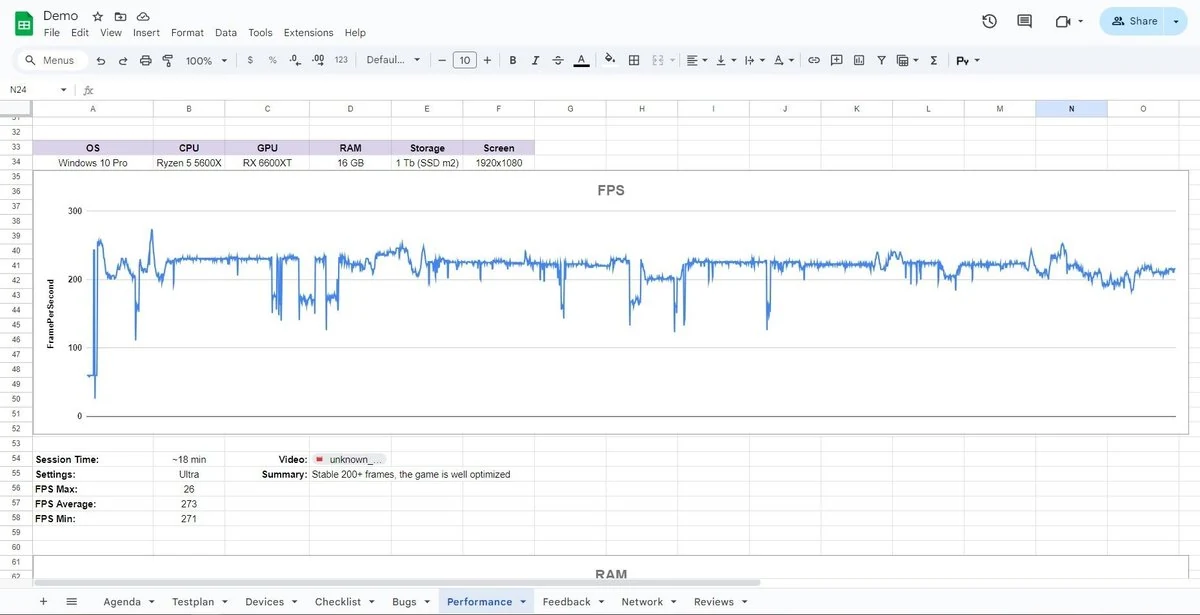
- For PC applications: metrics include FPS, RAM usage, CPU load, and GPU load.
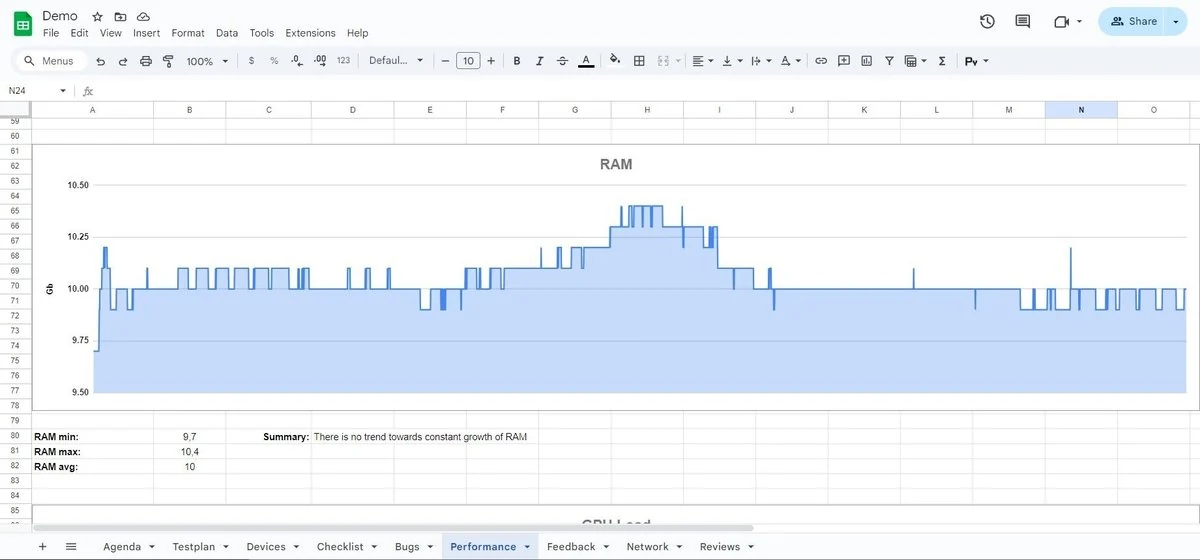
RAM
Graphs show whether memory usage keeps growing over time or whether consumption remains stable.
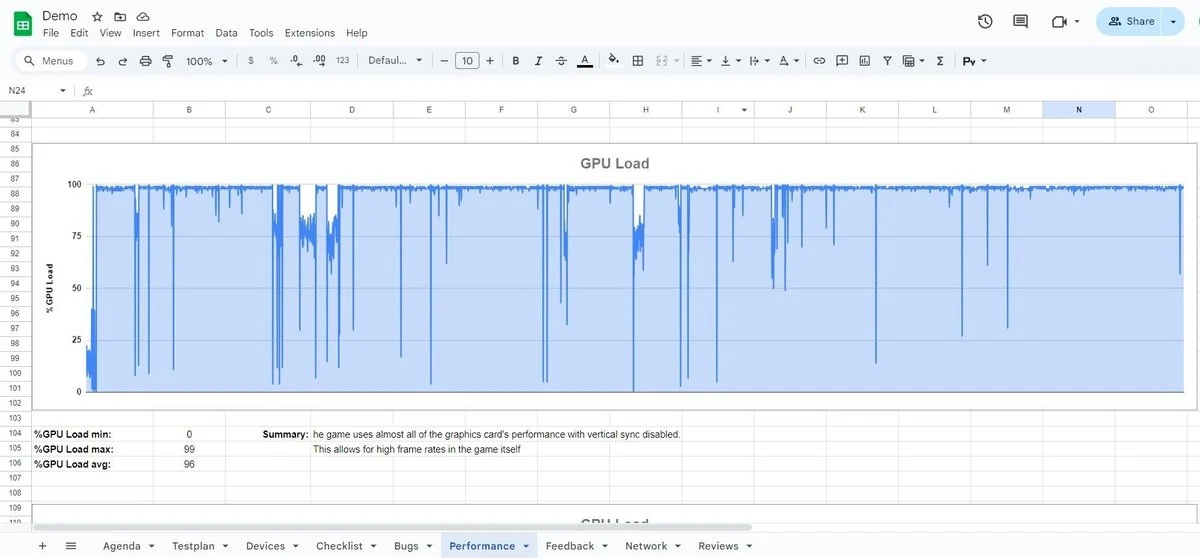
GPU load
Here it is important to check how effectively the video card is being used. If the GPU load is consistently 90-99%, then the app is using the graphics card efficiently. However, if the app fails to deliver stable 60 FPS and both CPU and GPU are not fully loaded, then the app is under-optimized.
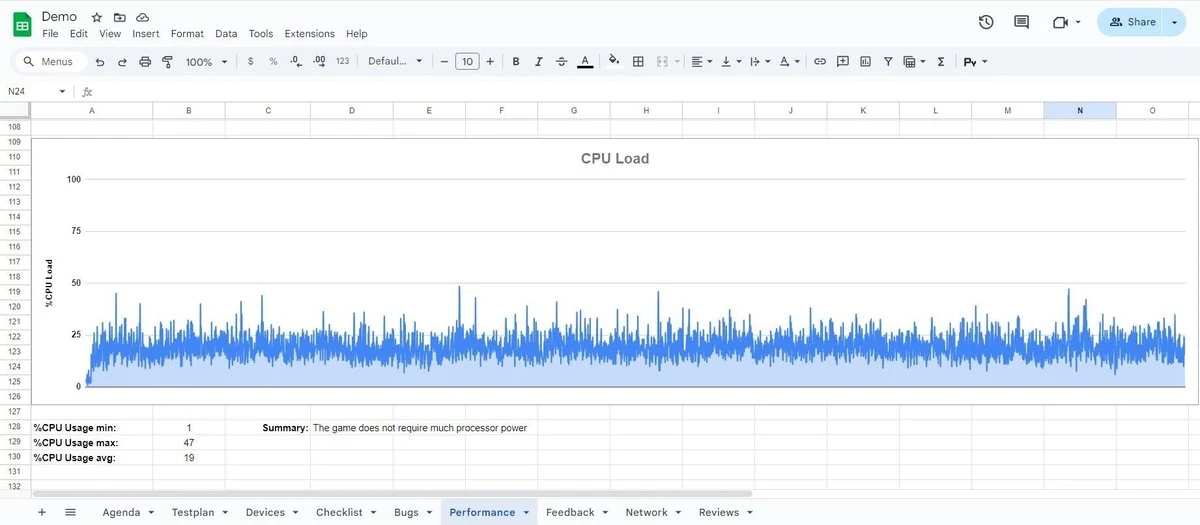
CPU load
Similar analysis applies, checking whether the processor is overloaded.
At this stage, performance bottlenecks are identified. Eliminating them increases the app’s usability and smoothness.
7. Feedback
Feedback, or UX testing (User Experience Testing), is where the tester provides personal impressions and thoughts about the application’s usability.
It is important to provide detailed feedback, including:
- what was liked/disliked from a user perspective;
- which moments felt unusual;
- how this affects gameplay;
- possible solutions to these issues;
- how fixes would change the app and what improvements they would bring.
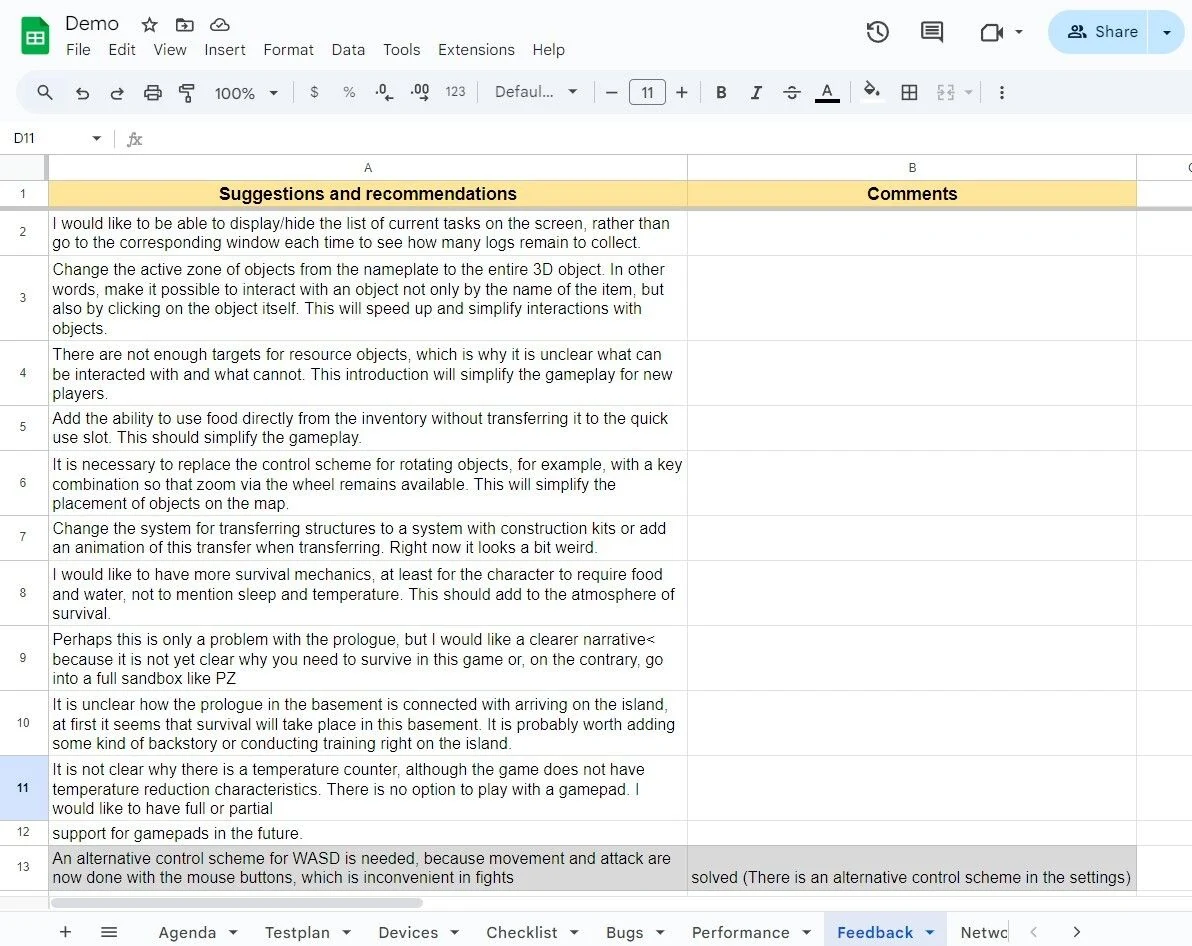
Feedback provides a subjective perspective, but it helps uncover the effectiveness of the user’s interaction with the product.
8. Network
The Network section makes it possible to artificially influence the state of the connection and observe how the application behaves under different conditions.
First, the tester must decide how they will manipulate the internet connection:
- disconnecting the internet completely;
- switching from Wi-Fi to mobile data;
- simulating unstable connections.
On mobile, this requires a USB Wi-Fi adapter.
Then, testing scenarios may include:
- app startup and loading;
- map/level loading;
- gameplay;
- purchasing in-game items or rewards;
- IAPs (in-app purchases);
- ad viewing.
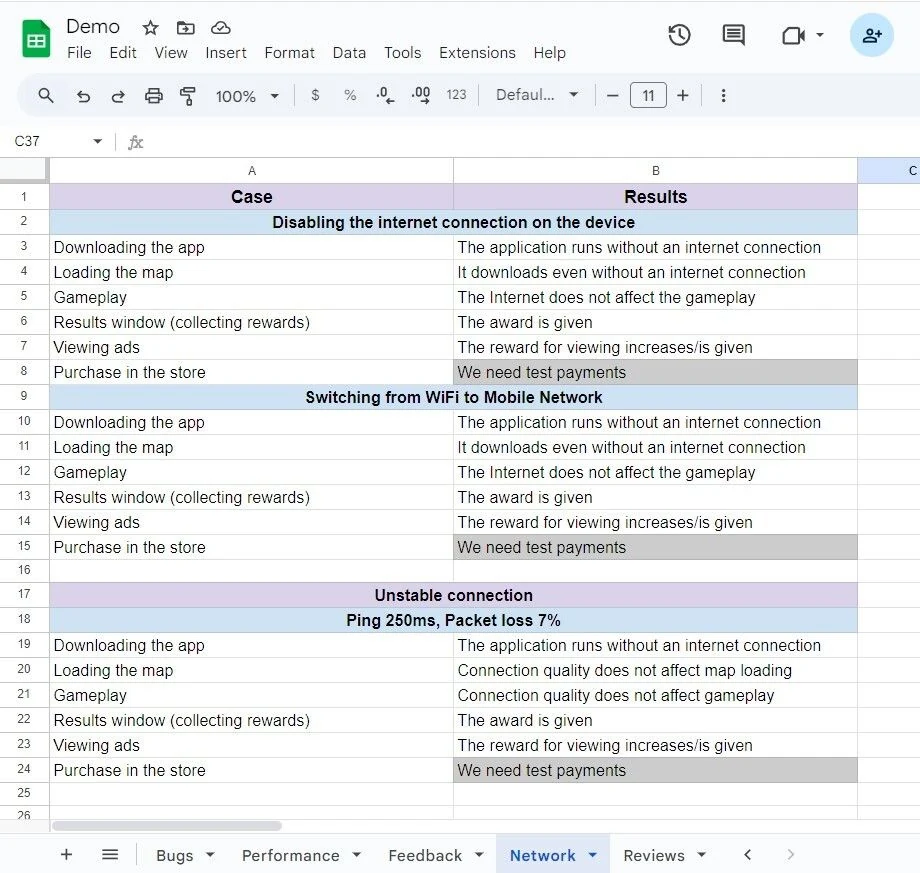
This stage allows anticipating and preventing issues that real users might face under poor network conditions, which makes it a critical step of exploratory testing.
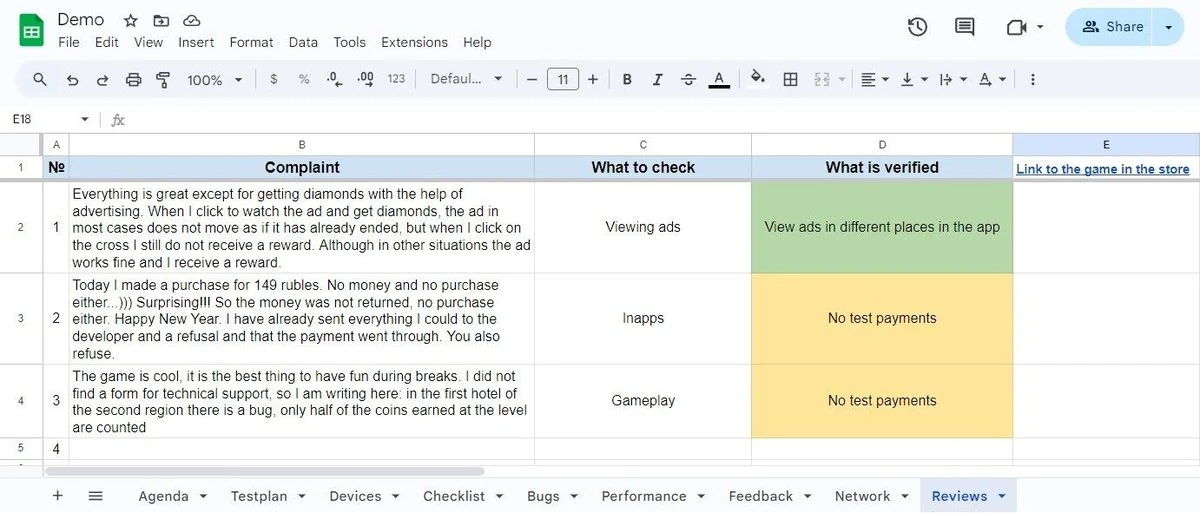
9. Reviews
At this stage, testers analyze user reviews in app stores. It is important to focus only on comments pointing to concrete issues or errors.
Examples include:
- app freezing under certain conditions;
- app lagging under certain conditions;
- app crashing under certain conditions;
- broken gameplay mechanics.
After identifying such reviews, testers attempt to reproduce the reported issues.
- If reproducible, document the bug in the “Bugs” section.
- If not reproducible, note that attempts failed, describing what was done.
- If impossible to reproduce for specific reasons, state the reasons (e.g., requires longer playthrough, no access to test payments, etc.).
Conclusion
Now you know that preparing an exploratory document is not a trivial task but rather the primary and foundational step in getting to know the application and its capabilities. Later, this document becomes an essential tool for successful testing and bug detection.
That is why this task should be approached with maximum responsibility, since the overall quality of the testing process directly depends on it.