Texturing 3D Models for Games: A Practical, Studio-Ready Guide
Through texturing, simple meshes read as real-world surfaces - pliant leather, satin-finished steel, weathered paint, and water-slick stone. It’s also where many pipelines go off the rails: inconsistent UVs, noisy roughness, bloated texture memory, or looks-great-in-Marmoset assets that collapse under in-engine lighting. This in-depth guide distills production-proven principles for game-ready 3D texturing across PC, console, and mobile. You’ll get concrete steps, checklists, optimization tips, and QA traps to avoid - so your textures look great and ship smoothly.
What You’ll Get
You’ll get: a clear breakdown of texture map functions; UV planning with texel-density targets; proven baking techniques; PBR tuning guidelines; practical Substance Painter workflows; channel-packing tactics; performance budgeting; and a ready-to-apply, end-to-end texturing pipeline.
Why Texturing Matters (Beyond “Make It Pretty”)
- Perceived realism & style: Properly authored base color, roughness, and normal detail shape how surfaces read under light. PBR-consistent materials feel believable even in stylized worlds.
- Readability & UX: Clean value separation and material contrast help players parse scenes at a glance, especially on small screens.
- Production velocity: A disciplined texturing pipeline (UV rules, material dictionaries, shared smart materials) prevents rework and speeds up content drops.
- Performance & memory: Texture size, format, and shader inputs often dominate over raw triangle counts; efficient packing and LODs keep frame time stable.
Inspiration: We expand on the basic “why and how” of texturing and turn it into a deeper, production-oriented playbook for your team.
PBR in Plain English: What Actually Drives the Look
Physically Based Rendering (PBR) means your material parameters approximate real-world light behavior. The objective isn’t photorealism but consistency - so assets sit seamlessly across different scenes and lighting conditions. Core channels in the metal/rough workflow:
- Base Color (Albedo): The inherent surface color - no lighting or AO baked in.
- Metallic: 0 (dielectric: wood, plastic, fabric) or 1 (metal). Metals tint reflections with their base color.
- Roughness: Micro-surface scatter. 0 = mirror-like; 1 = matte.
- Normal: Encodes small surface angles to fake geometric detail.
- Ambient Occlusion (AO): Optional multiply term that darkens crevices; use sparingly to avoid “dirty snow.”
Unreal’s documentation is a solid reference for the why behind these inputs and how engines expect them to behave.
Other common maps
- Height/Parallax: Micro relief; use judiciously (mobile may disable).
- Emissive: Light-emitting elements (screens, runes).
- Opacity/Opacity Mask: Cutouts and glass; watch overdraw.
- Subsurface/Transmission: Skin, wax, leaves; budget carefully.
UVs & Texel Density: The Foundation of Good Texturing
Poor UVs sabotage even the best painterly skill. Lock these fundamentals early:
- Maintain uniform texel density by setting a target - e.g., 512-1024 px/m based on camera distance - and applying it consistently across assets. Apply a checkerboard test pattern to verify texel density before running your bakes.
- Seams with intention: Place seams where curvature or occlusion hides them; align to material transitions (e.g., leather - metal).
- Padding & packing: Ensure enough gutter (e.g., 8 - 16 px at target res) to prevent mip bleeding. Arrange UV islands efficiently with snug packing, but avoid awkward rotations that make painting difficult.
- Mirroring vs. uniqueness: Mirror symmetrical forms to save memory, but break symmetry where close-ups or decals matter.
- Use UDIMs only when they add clear value - hero pieces and cinematics - and keep them minimal on gameplay assets unless your engine and memory budget can comfortably support the extra load.
Tip: In Substance Painter, the Texture Set settings govern resolution, channels, and mesh maps - document defaults in your style guide.
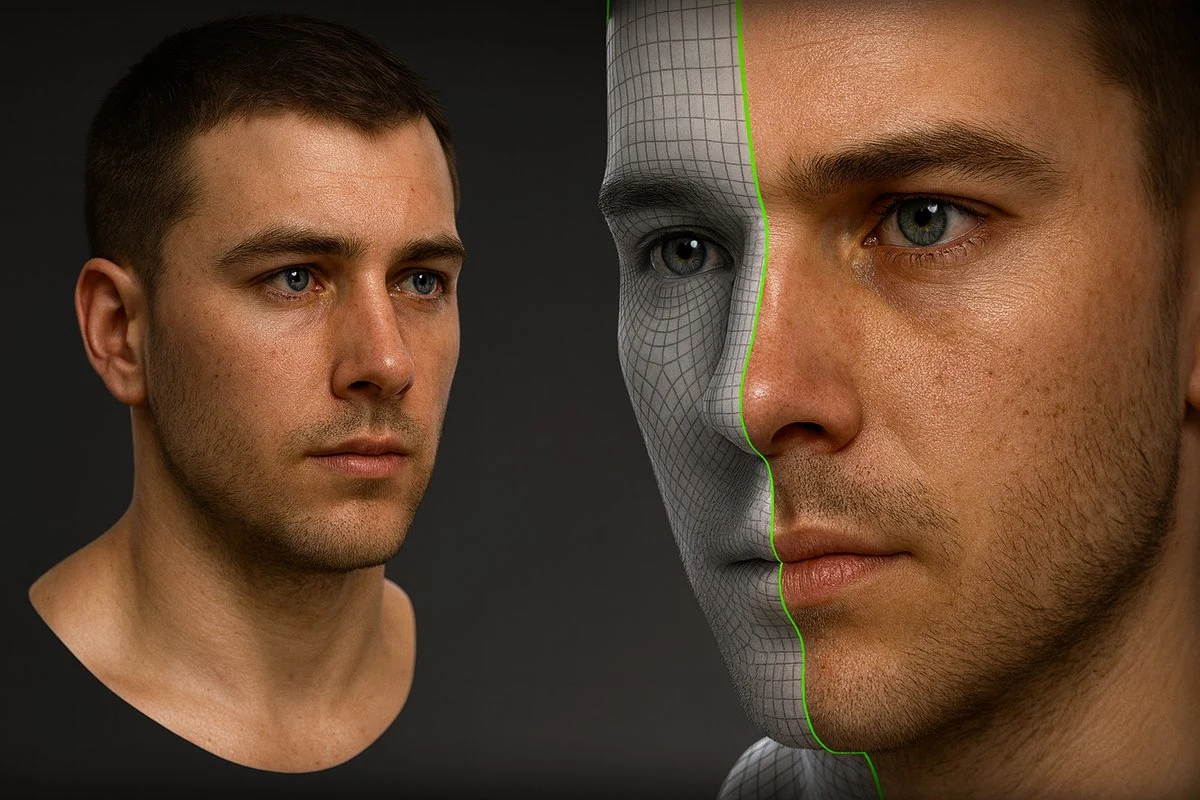
Baking: Get Detail “For Free” (and Avoid the Usual Artifacts)
High-to-low baking transfers sculpted detail without runtime cost. Best practices:
1. Clean naming & cages: Match high/low pairs by suffix, set custom cages to prevent ray misses/overlaps.
2. Smoothing groups: Hard edges usually = UV splits; keep logic consistent to reduce shading gradients.
3. Exploded bakes where needed: Separate intersecting parts to avoid projection errors; reassemble for texturing.
4. Map set: Normal (tangent), AO, Curvature, Thickness, Position. Painter’s bakers or dedicated tools both work - standardize on one.
5. QA the bake: Look for waviness, skewed gradients, visible seams, and unmatched hard edges in viewport shaders that mimic in-game shading.
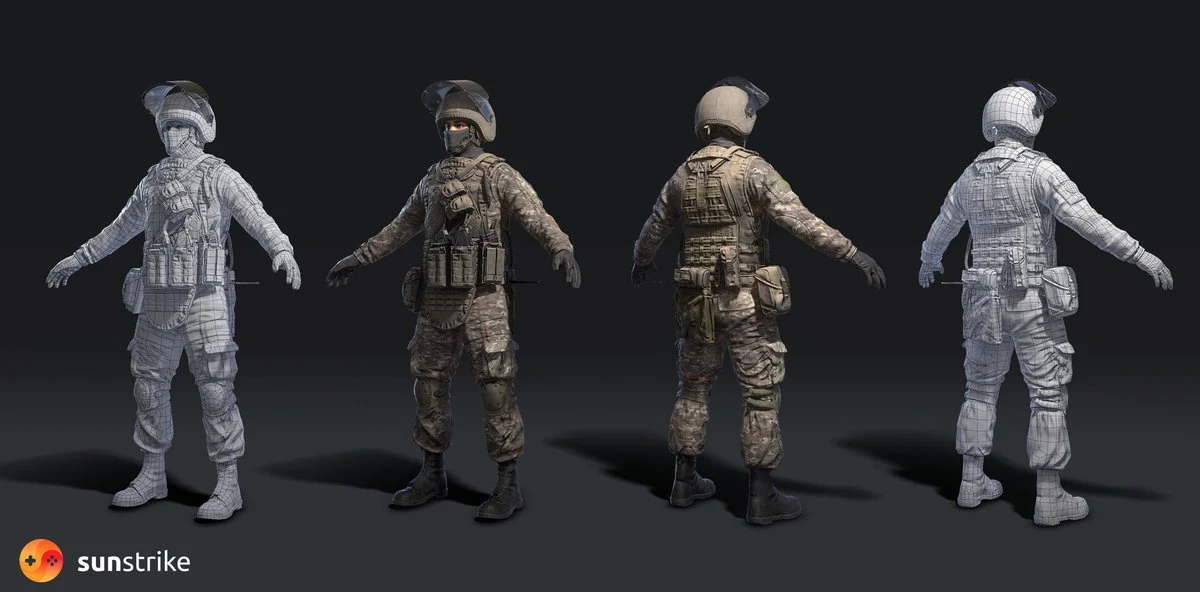
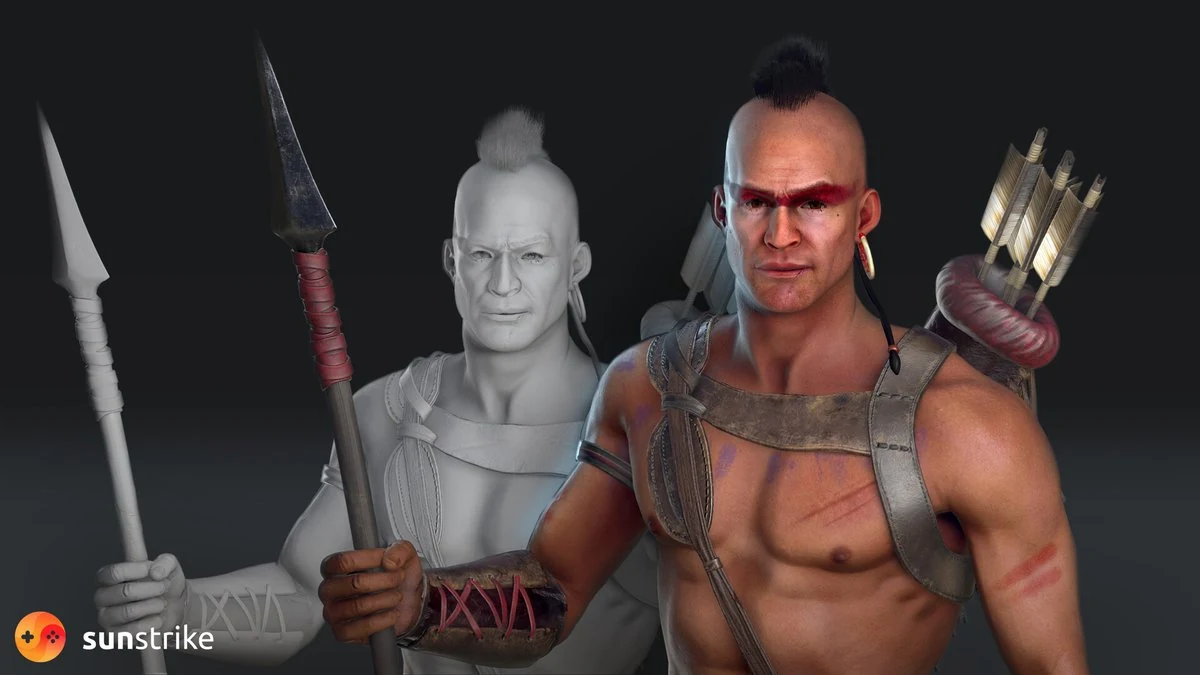
Authoring Materials: Calibrated, Repeatable, and On-Brand
Build a Material Dictionary
Document target value ranges (roughness bands, metalness usage), color swatches per faction/biome, and wear logic (edges vs. cavities, dirt intensity). Lock ranges so different artists land in the same ballpark.
Smart Materials & Generators (Substance Painter)
- Start with smart materials (layer stacks with masks) for metals, plastics, fabrics.
- Use generators (Curvature, AO, Position) to drive edge wear and dirt automatically, then hand-paint hero accents to avoid the “cookie cutter” look.
Keep Base Color Clean
No baked lighting, no AO, no stylized shadows in PBR base color unless your look specifically calls for it (NPR). It ensures consistent behavior across day/night, indoor/outdoor, and LUTs.
For studios scaling production with 3D character design services, shared material dictionaries are non-negotiable: they keep visual consistency across artists and outsourcing partners.
Channel Packing & Export: Less Files, Faster Loads
To reduce texture count and bandwidth:
- ORM packing: R = AO, G = Roughness, B = Metallic (swap channels to match your engine).
- Normal format: Use tangent-space normals with correct Y orientation (OpenGL vs. DirectX).
- Bit-depth discipline: 8-bit is fine for roughness/metal; use 16-bit where banding appears (height/displacement).
- Compression & formats: BC/DXT for desktop/console, ASTC/ETC2 for mobile. Make your Substance Painter export presets match the engine’s import expectations to prevent flipped channels and unnecessary recompression.
Lighting & Lookdev: Make the Texture Work Under Real Conditions
Texturing isn’t complete until it holds up under your project’s in-engine lighting:
- Neutral lookdev scene: One HDRI + one key + one rim; two LUTs (neutral + in-game).
- Engine parity: Preview in the target engine’s shading model whenever possible. Material Instances/Material Variants speed iteration in Unreal/Unity.
- Roughness sanity: Most real-world materials sit in the mid-roughness range; ultra-gloss should be rare outside polished metals and wet surfaces. Cross-check with real references (photo boards).
Performance Budgets: Make Art That Ships
Textures can dominate memory and I/O. Bake discipline into your pipeline:
- Per-category budgets: Set caps for texture memory per scene and per asset type (characters, weapons, props, environment modules).
- Resolution ladders: Define which assets get 2k/1k/512. Avoid defaulting to 4k.
- MIP bias & streaming: Use aggressive MIP streaming in outdoor scenes; prioritize hero assets.
- Alpha & overdraw: Prefer cutouts over soft alpha when possible; limit layered decals on mobile.
- Material permutations: limit shader variation and rely on a compact, reusable set of master materials.
A Studio-Ready 10-Step Texturing Workflow
1. Lock intent & references
Assemble a reference board of real-world materials - textile weaves, plastics, and brushed metal finishes. Annotate what you want from each: color range, sheen, wear logic.
2. UVs & Texel Density Pass
Apply your checker; fix stretching, unify density, add padding. Document which islands will mirror.
3. Bake Mesh Maps
Generate normal/AO/curvature/thickness/position using standardized settings. Store bakers in source control alongside the low poly.
4. Block Materials
Assign provisional materials (metal, plastic, leather) and apply flat values in engine to test read under gameplay lighting.
5. Author Smart Materials
In Painter, layer base - mid wear - edge accents - dirt; drive with generators, refine by hand to avoid procedural sameness.
6. Roughness Pass (The Truth Serum)
Tune roughness in context. Switch among lighting setups, tweak exposure and LUTs, and validate the asset in both daytime and nighttime scenarios. Keep metals physically plausible.
7. Color Reality Check
Verify albedo values - avoid crushed shadows and blown-out highlights. Ensure faction/biome palettes match your dictionary.
8. Export & Pack
Use engine-ready presets: correct channel packing (ORM), normal orientation, bit-depth, and naming. Painter’s export templates help here.
9. Engine Integration
Hook up Material Instances/Variants, set texture streaming pools, and profile. Test LOD transitions for texture aliasing/pops.
10. QA & Polish Loop
Visual QA: seam checks, roughness flicker, MIP shimmer, tiling repeats, color banding. Performance QA: memory residency, texture thrash, alpha overdraw hot spots.
Tooling You’ll Actually Use
- Adobe Substance 3D Painter for baking, smart materials, generators, and export presets. Start with Painter basics, then add fast texturing with generators and scan-based materials.
- Substance 3D Designer for procedural tileables (concrete, fabric, wood) and parameterized wear.
- Unreal Engine / Unity material systems for master materials, instances, and runtime testing under real lighting.
Common Pitfalls (and How to Fix Them Fast)
Baked AO in Base Color
Symptom: muddy, dirty look under dynamic lighting. Fix: remove AO from base color; apply ambient occlusion as a separate term or rely on SSAO in-engine.
Glossy Everything
Symptom: plastic sheen in scenes. Fix: audit roughness histograms; push most dielectrics toward mid roughness with subtle variation.
Procedural Overkill
Symptom: repeating noise, identical wear across assets. Fix: hand-paint breakups on focal areas; add unique decals where needed.
UV Stretching & MIP Bleed
Symptom: smeared paint and dark seams at distance. Fix: straighten UVs for directional materials; increase padding; verify MIP chain and compression.
Inconsistent Palette Across Artists
Symptom: mismatched plastics, metals, fabrics. Fix: enforce your material dictionary and shared smart materials; review with a “calibrated” lookdev scene.
Optimization for Platforms
1. Mobile & Switch
- Favor 512-1k textures for most props; 2k only for hero items.
- ASTC/ETC2 compression; channel pack aggressively; avoid depth-heavy parallax.
- Keep alpha tests over alpha blend where feasible; limit layered decals.
2. PC/Console
- Use 2k for heroes; virtual textures/streaming for large environments.
- Where the camera lingers, incorporate clear coat, subsurface scattering, and detail normal maps - and budget their cost on a per-scene basis.
- Lean on Material Instances for rapid tuning and variant sets.
3. VR/AR
- Ultra-tight budgets: low material permutations, minimal overdraw, conservative roughness for stable specular at high refresh.
Collaboration & Hand-Off: Make Outsourcing Frictionless
When you scale with external teams (hello!), clarity saves months:
- Style guide package: UV guidelines, a texel-density reference, a materials glossary, naming/versioning conventions, standardized export presets, and a shared lookdev scene.
- Example set: a benchmark-quality hero asset and a representative background prop, each supplied with full source files - Substance Painter project, baked maps, and final textures.
- Validation scripts: that automatically verify naming conventions, texture resolutions, ORM channel packing order, normal map orientation, and atlas usage.
- Feedback cadence: Screenshot sets at fixed camera angles + in-engine captures under standard lighting.
SunStrike Studios’ art and QA teams integrate with your DCC and engine pipelines, follow your style guide, and introduce automation where needed - so every delivery slot is smooth. Teams looking to extend this kind of workflow into their broader art stack often pair texturing with our 3D game art outsourcing services and stylized game backgrounds for a unified pipeline.
Your Next Steps (Copy-Paste This Mini-Plan)
1. Set material ranges (roughness bands, metal usage) and a texel density chart.
2. Create a neutral lookdev level in your engine.
3. Bake a single hero asset and run the 10-step workflow above.
4. Lock Painter export presets to your engine’s channel expectations.
5. Add QA gates: seams, roughness sanity, MIP shimmer, packed channel correctness.
6. Scale with shared smart materials and a material dictionary everyone follows.
Why Teams Choose SunStrike Studios
We deliver outsourced game art, QA, and full-cycle development with a texturing pipeline tuned for modern engines. We also provide dedicated 3D character design services, including full-cycle character modeling from concept to production-ready asset. Whether you need stylized hand-painted assets or calibrated PBR for photoreal worlds, our artists, tech artists, and QA work as a single unit:
- Texturing & Materials: Painter/Designer, trim/atlas strategy, channel packing, master materials, and export automation.
- QA & Optimization: Visual QA + performance sweeps across device matrices so what looks perfect in the viewer also sings at 60-120 FPS.
Have a build or vertical slice you want us to audit? Send it our way - SunStrike Studios can help you lock your material look, hit performance budgets, and scale content with confidence.