3D Car Models for Games: Modeling Workflow, Topology & PBR Guide
Car modeling sits at the crossroads of hard-surface craftsmanship and real-time performance. Automotive bodies demand pristine reflections and surface continuity; interiors mix organic cushions with stitched seams and plastics; wheels and optics add intricate detail that must still run at target frame rates. This guide from SunStrike Studios lays out a studio-tested approach to building game-ready cars for Unity, Unreal, and custom engines - covering concept and reference, topology, materials, baking, optimization, rigging, and QA. It’s written for producers and artists who need results that look premium in screenshots and hold steady in motion on real devices.
Clarify purpose, scope, and style before opening your DCC
Every decision about topology, materials, and time spent is easier once the project’s purpose is honest and explicit. Decide where the car will live and what it must do. A hero vehicle for a showroom scene, a drivable player car, a background traffic mesh, and a tiny mobile billboard all imply different budgets and workflows. Tie the visual target to your game’s camera and platform: photoreal showroom paint needs layered clear-coat and clean curvature; a stylized racer wants confident silhouettes, bolder edge breaks, and compressed values. If you’re reproducing a real brand, confirm licensing requirements early so badges, trims, and proportions comply with the agreement and legal guidelines.
A short art brief helps align everyone. State the camera distances, the environments the car will appear in, the primary material family (classic paint, matte wrap, rally mud, cyber-chrome), the time of day for hero shots, and the expected wear level. Add two or three target renders that convey the mood and the way reflections should flow. These references keep the team from fighting taste wars later.
Build reference boards and clean blueprints
Good modeling starts with good references. Gather orthographic blueprints if they’re available, but don’t rely on a single diagram. Blueprints vary in quality; photographs and manufacturer dimensions help check proportions. Build a board that includes front, side, and rear profiles, close-ups of panel gaps, headlight internals, wheel designs, brake calipers, tires, underbody shields, wipers, mirrors, interior trims, and emblem placement. For stylized work, collect simplified, graphic interpretations that show how your style compresses form and color.
Calibrate your scene to real-world units. Align the wheelbase and track width to known measurements, then place the image planes so orthographic views aren’t fighting perspective distortion. When blueprints conflict with photos, trust measured specs and consistent photographic cues such as door cut lines and window shapes.
Block out the body with large, confident masses
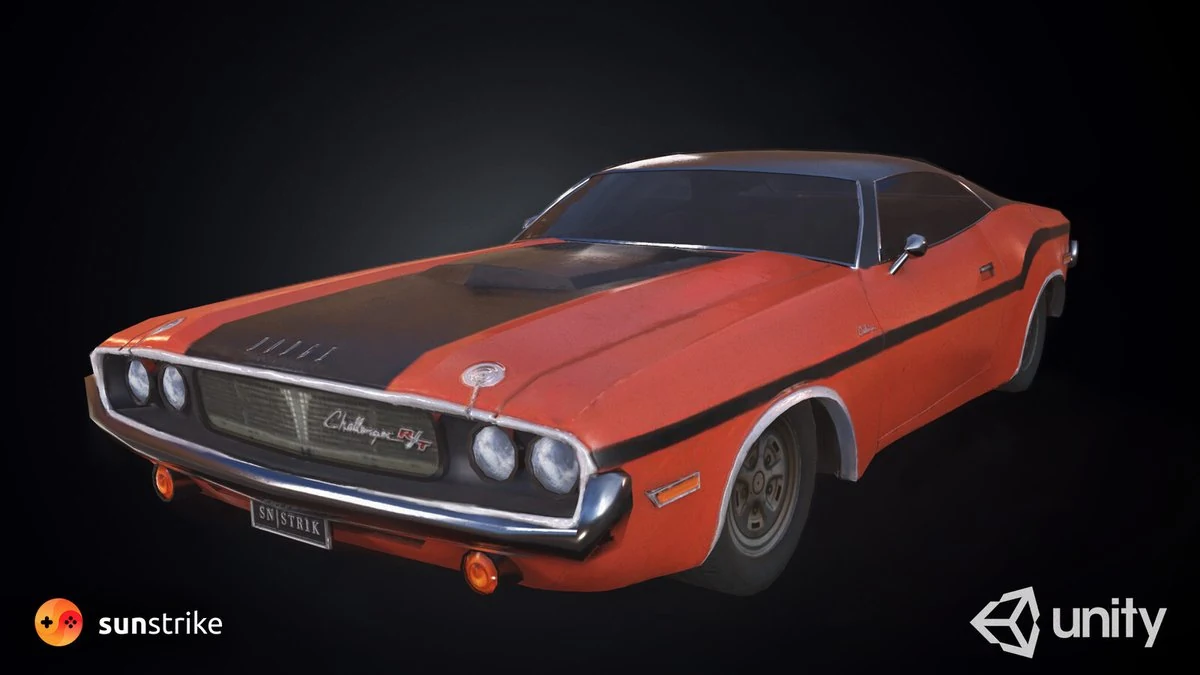
The fastest way to a clean car is to delay details. Start from big volumes and flowing transitions. Use simple primitives or a cage that sketches roof arch, hood, fenders, door bulges, rear quarter, and trunk in broad strokes. Keep edges light and editable. Focus on the S-curve of the side body, the tumblehome of the greenhouse, and the relationship between fender flare and wheel diameter. If reflections look right on a clay shader at this stage, the rest of the job is already easier.
Keep the scale honest while you block. Drop in temporary wheels at the intended diameter and ride height so arches and flare read correctly. The stance of the car - how it sits over the wheels - sells character more than micro-detail.
Choose a modeling approach that matches the finish you need
Hard-surface cars are most often built with subdivision modeling and retopology, sometimes with NURBS or patch modeling for artists who prefer CAD-like surface logic. Subdivision favors predictable deformations and quads, which bake well into game meshes. NURBS or patches can produce silky curvature on long, compound surfaces; many artists convert patches to polys for the high-poly bake, then retopo for runtime.
Whatever approach you pick, aim for controlled support edges and carefully placed creases. Panel gaps belong to the material stage, not to the base form. A common mistake is cutting door lines too early; keep panels continuous until the reflections are perfect, then carve gaps at the end so edges remain crisp without creating ripple.
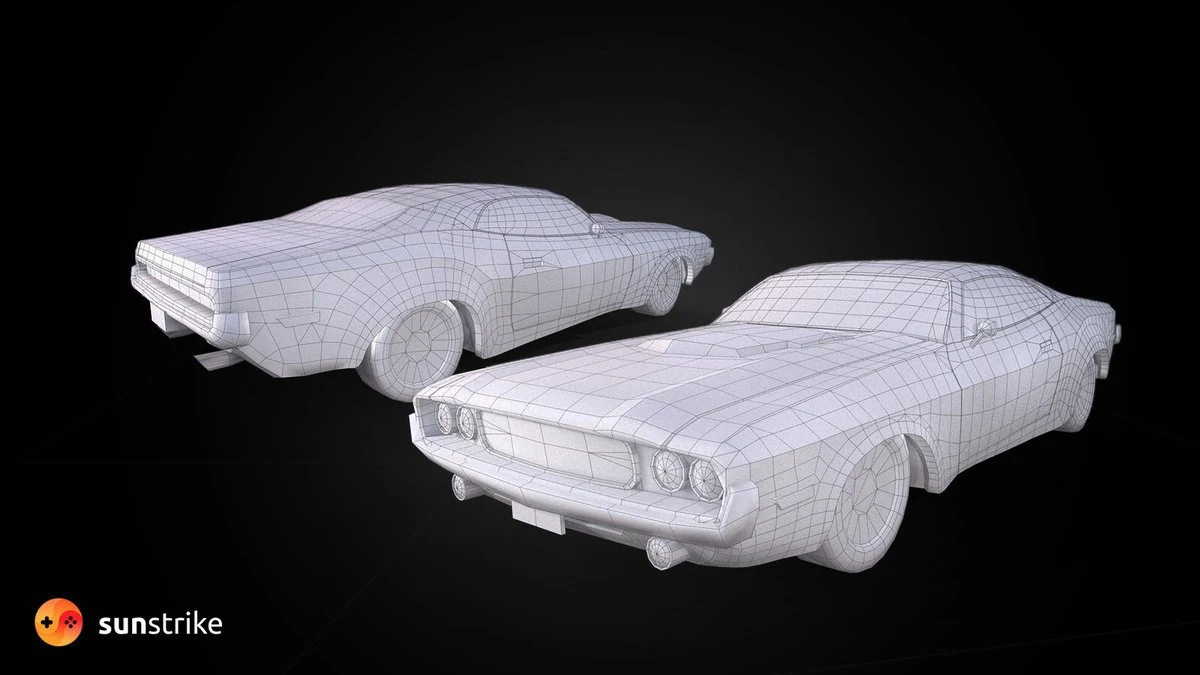
Topology rules that keep reflections calm
The body of a car is a giant mirror. If topology fights surface continuity, the mirror ripples. Favor quad-dominant flows that follow curvature. Keep poles sparse and parked in flat or hidden areas, not mid-panel. Use even edge spacing so subdivision doesn’t create tension lines. Where you need a crease - like along a hood edge or a shoulder - set a pair of supporting loops that preserve the tightness you want without pinching adjacent surfaces.
Think in terms of continuity. Large body panels want smooth changes in direction with no abrupt kinks unless the design calls for a break line. When you preview with a matcap or a glossy clay, scrub a light across the surface and watch the highlight. If it staggers or bunches, relax the underlying loops and remove unnecessary poles. Getting this right at the blockout saves days later.
Carve panels and define gaps without destroying flow
Once the body reads well as a single shell, separate doors, hood, trunk, and fuel flap. A clean method is to duplicate the shell, cut the region, and thicken slightly to introduce realistic panel thickness. Chamfer the outer edge to catch a subtle highlight that reads like a stamped panel. Keep gaps consistent; real cars vary, but visual consistency is better for a game model unless you’re reproducing a specific vehicle up close.
Inside faces around gaps should be simple and well shaded. Real panel cavities are often painted matte black or body-colored with shadow. Over-modeling these interiors adds cost where it seldom matters. Use a trim or a dark material instead of dense geometry unless the camera peers right into the gap.
Model wheels and tires as modular components
Wheels are separate assets for a reason. Treat the rim, tire, brake disc, caliper, and center cap as individual meshes with clean pivots. The rim wants crisp bevels on spokes and lug recesses so reflections don’t break. The tire benefits from a believable sidewall profile and subtle bulge where it meets the ground; the tread can be geometry on a showroom model or a normal map for runtime. Brake discs need vent holes or slots that read through the spokes, while calipers should align with the disc radius and sit correctly behind the barrel.
Create a library of common rim styles and tire profiles if your game features multiple trims. Modular pieces speed content drops and help with LOD authoring: you can lower triangle counts on the wheel independently, swap a simplified brake for distance, or collapse tread detail to a flat normal far from the camera.
Build believable optics without wrecking performance
Headlights and taillights are jewelry. They include lenses, reflectors, projectors, turn signal modules, and decorative DRL strips. In real-time, those layers multiply overdraw. Separate what truly matters from what can be baked.
A dependable pattern is to model the outer lens with a subtle thickness and a dedicated glass material, then model the main reflector or projector bowls underneath with a bright metallic material that respects your PBR rules. Decorative internal textures can be packed into a tiling or atlas sheet and mapped onto simple geometry. For DRLs and brake lights, use emissive with carefully tuned intensity and a slight gradient so it doesn’t bloom harshly. For stylized games, flatten the internal layers to bold shapes and let VFX carry the signature light patterns.
Finish exterior details without losing the big read
Mirrors, wipers, door handles, antenna fins, fuel lids, parking sensors, grilles, and badges add realism and scale. Prioritize items that influence silhouette and reflections first. For grilles and vents, balance geometry and alpha cards. Full 3D honeycomb can moiré in motion; a mesh with depth at close range that transitions to a normal-mapped card farther away often looks better and costs less. Keep the badge as a separate piece so variants and licensing builds are easy to manage.
Underbody plates, exhaust tips, and diffusers need enough volume to catch light, not an explosion of loops. A low-frequency shape with intelligent shading reads more convincingly than dense, flat geometry.
Decide how much interior to build
Interiors consume time. If the car is a playable cockpit or convertible, commit to a proper cabin with seats, dashboard, wheel, shifter, center console, instrument cluster, and door cards. If interior views are limited to glimpses through tinted glass, model a simplified cabin with shadowed materials and blocked-in forms that suggest depth. A lightweight interior avoids the uncanny valley through tasteful abstraction rather than detail that no one sees.
Seat cushions and stitched seams blend hard-surface logic with organic sculpting. Sculpt primary volumes for cushions, then retopo and place stitch lines as geometry or normal detail depending on distance. Leather grain is best delivered through material detail normals rather than unique, heavy textures.
Prepare a high-poly for baking, then retopo for runtime
For most game pipelines, the high-poly exists to create maps that fake micro-detail on a clean, low-poly mesh. Keep the high-poly clean and layered so you can mute or sharpen details without remeshing. Avoid razor-thin chamfers that collapse when baked; broader support edges bake more reliably. Duplicate thin parts like fins and badges so they can be exploded for baking to prevent projection accidents.
Retopology should obey the flow you already established in blockout. Favor even quads, avoid long skinny triangles, and keep bevels where they hold silhouette under your intended camera. Maintain separate meshes for pieces you’ll want to animate or swap, such as doors, wheels, and spoilers. Create simple collision shells while you retopo, since they share logic with the runtime pieces and keep scale honest.
Unwrap with a texel-density target and smart symmetry
A predictable unwrap accelerates texturing and reduces memory. Decide on texel density based on the closest gameplay camera and the platform. Keep density uniform across large continuous materials like body paint to avoid shimmering. Favor straightened UVs on directional materials such as carbon fiber and brushed metal. Place seams along panel gaps and under trims where the eye expects boundaries. Mirror left and right sides of the body where possible to save texture space, then break symmetry in paint or decals if the design needs asymmetry.
Atlas shared small parts - screws, sensors, minor plastics - onto a single sheet. For customizable liveries or racing numbers, reserve UV space or use a separate decal material so you can swap graphics without repacking the main maps.
Bake maps cleanly and verify in a look-dev scene
A reliable bake gives you normal, curvature, ambient occlusion, and position information tuned to your engine’s tangent space. Name pairs and use bake cages to minimize projection errors. When geometry intersects, explode the model so rays don’t capture unwanted neighbors. Prefer the tangent basis your engine uses to avoid shading mismatches later.
Once maps are baked, validate them in a neutral look-dev scene with a simple HDRI, a key light, and a rim. Rotate a bright highlight across the body panels and watch for waviness, banding, or seams. If any show up, fix the mesh, rebake, and only move on when reflections glide. For a deeper dive on the texturing side of the pipeline - PBR authoring, channel packing, and platform optimization - see our guide on texturing 3D models for games.
Author materials that honor PBR and tell a story
Car paint is a layered system. Base color defines hue and saturation, metallic flakes add sparkle and directional glint, and clear-coat creates the broad, crisp highlight that makes the body read like finished paint. In real-time, that becomes a shader with a base layer and a clear-coat lobe, sometimes with a separate normal for the flake layer. Keep ranges grounded so the car doesn’t look like plastic or chrome. Real automotive paint rarely goes mirror-polished across the whole body unless it’s a studio render; a hint of micro-roughness in the clear-coat makes reflections believable.
Other materials round out the set. Chrome wants a high-metallic, low-roughness response with accurate fresnel. Brushed aluminum introduces directional anisotropy. Plastics range from textured bumper covers to glossy piano trims; use material variation sparingly so the cabin doesn’t become a value salad. Rubber for tires and window seals benefits from mid-roughness with muted specular. Glass needs thickness, correct normals, and fresnel; in real-time, refraction is expensive, so rely on reflection captures and transmission tricks that are stable on your target devices.
A restrained dirt and wear pass can ground the asset. Channel broader grime to lower surfaces and wheel wells, add faint road pebbles behind the wheels, and soften edges where hands and weather interact. Keep it tuned to the fantasy: a showroom demo wants immaculate finish; a rally stage begs for splatter and dust. Studios that need this level of finish can scale the effort through dedicated 3D game art outsourcing partners who already have shader libraries and texture pipelines in place.
Plan LODs and variants that scale across platforms
Cars are perfect candidates for thoughtful LODs. High-detail wheels murder frame time when dozens are on screen. Author a near mesh that sells spokes, lug recesses, caliper shapes, and tread, then create mid and far versions that collapse spoke counts, flatten treads, and simplify brake geometry. For body panels, remove small greebles and thin edges as distance grows. Tail lights and DRLs can swap to baked emissive cards in far LODs. If your game includes many variants, reuse trim libraries and material slots so changes propagate without bespoke texture sets per car.
Mobile builds benefit from shader simplification at distance. Car paint can fall back to a single lobe, glass can lose expensive transmission, and interior visibility can toggle off when windows are heavily tinted. These switches belong in feature tiers defined in preproduction, so artists know what’s safe to rely on.
Rig wheels, steering, and optional mechanics
A drivable car needs more than pretty meshes. Wheels require pivots centered at the axle, with forward movement driving rotation and steering input rotating the front pair around accurate knuckles. Brake calipers should remain anchored to the suspension, not spin with the disc. If your physics model supports suspension, establish bones or constraints for vertical travel and anti-roll behavior. Door and trunk hinges must rotate around plausible axes and stop within realistic ranges. Anything cosmetic - spoilers that deploy at speed, flaps that react to braking - gain credibility from small delays and eased curves, not just binary states.
Even static cars benefit from correct wheel orientation and believable ride height in each display pose. Those small touches create a sense of weight.
Integrate cleanly in engine and wire up reflection logic
Import with the correct scale and unit assumptions. Place pivots where world transforms make sense, name parts with consistent prefixes, and map materials to your engine’s master shaders. In Unreal, material instances for paint, glass, chrome, and plastics speed customization; in Unity, a small library of SRP-friendly shader graphs keeps batching healthy. Establish reflection capture probes or reflection probes that the car can read; cars look unfinished without convincing environment reflections. In outdoor scenes, blend reflection captures as the car moves; in indoor showrooms, anchor captures to the light rig for stable highlights.
Collision should be practical. Use convex hulls or primitives that match the body and wheel areas without tracing every curve. For gameplay that relies on contact, align colliders with physics materials so surfaces behave correctly on slides and impacts.
Optimize for performance and memory without neutering the look
Performance is a system problem, not a triangle count alone. Keep material permutations tight, share texture atlases for small parts, and pack ORM or similar channels to reduce texture reads. Limit transparency; most glass can be opaque with fresnel and masked wipers decals in gameplay. Avoid pattern-heavy grilles that cause specular aliasing; a tuned mip chain and slight roughness push tame shimmer without blurring the look.
Texture sizes should follow camera reality. A hero livery earns a higher resolution; underbody shields can live at smaller sizes. For games with multiple cars on screen, stream textures aggressively and budget GPU memory per scene so car swaps don’t thrash. Profile overdraw in motion, not just in stills, and watch tires against grass or gravel where alpha and particle effects compound costs.
Build a reliable QA loop that catches visual and runtime issues
Visual QA and performance QA must travel together. Inspect reflections on long panels for waves and unintended kinks. Sweep a highlight across fenders and doors to detect topology mistakes. Check baked normals for seams, skew, or gradient inversion. Verify that headlights and taillights bloom tastefully under your grade and that emissive values don’t clip. Exercise LODs in rapid camera moves for popping and material mismatches, especially on wheels and lights.
On the performance side, collect FPS and memory telemetry during crowd scenes, garage views with many cars, and weathered tracks full of particles. Confirm that shader variants stay within the planned set and that platform feature tiers actually apply at runtime. Run colorblind and nighttime readability passes if the car conveys critical UI through lights or emissive accents.
Stage lighting and presentation for portfolios and store assets
Even a perfect model dissolves under flat lighting. For promotional art, set a studio rig with broad softboxes, a controlled rim, and a floor that provides clean, coherent reflections. Work with graded LUTs that keep paint hues rich without crushing midtones. Adjust the clear-coat highlight width and intensity until the body breathes. Use graceful depth of field and restrained motion blur to suggest speed without smearing detail. For in-engine turntables, let the environment rotate subtly around the car or move the light rig to keep reflections flowing across the body, a classic trick in automotive photography.
Common pitfalls and how to dodge them
Many issues repeat across car projects. Wavy reflections reveal uneven topology; fix the mesh, not the shader. Early panel cuts cause pinches; carve gaps after the shell is perfect. Ultra-thin bevels look sharp in wireframe and bad in bakes; choose pragmatic widths that survive mip levels. Glass without thickness or correct normals reads like gray plastic; add depth and fresnel. Tires with glossy sidewalls or piano-black treads break immersion; tune roughness and specular response to rubber. Grilles with high-frequency geometry shimmer in motion; replace mid and far detail with normal cards and tune mip bias.
A final pitfall is forgetting the purpose. Overbuilding unseen interiors, packing every bolt into unique textures, or chasing CAD precision on background traffic wastes budget. Spend time where the camera lingers and where marketing will crop.
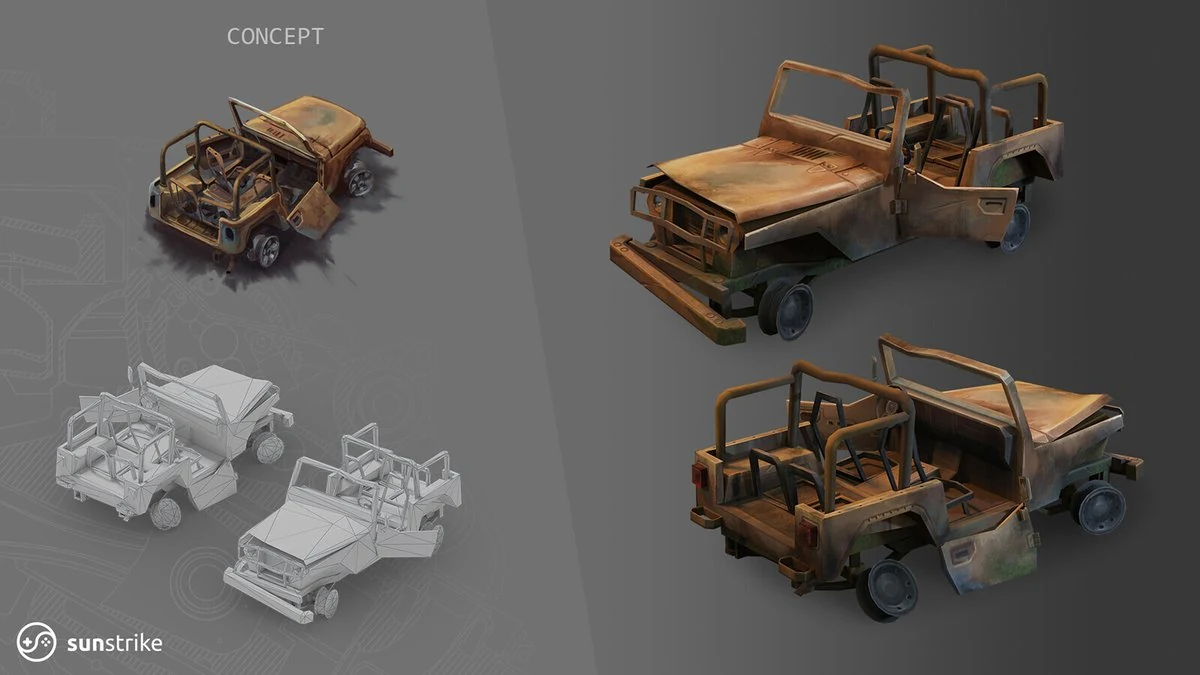
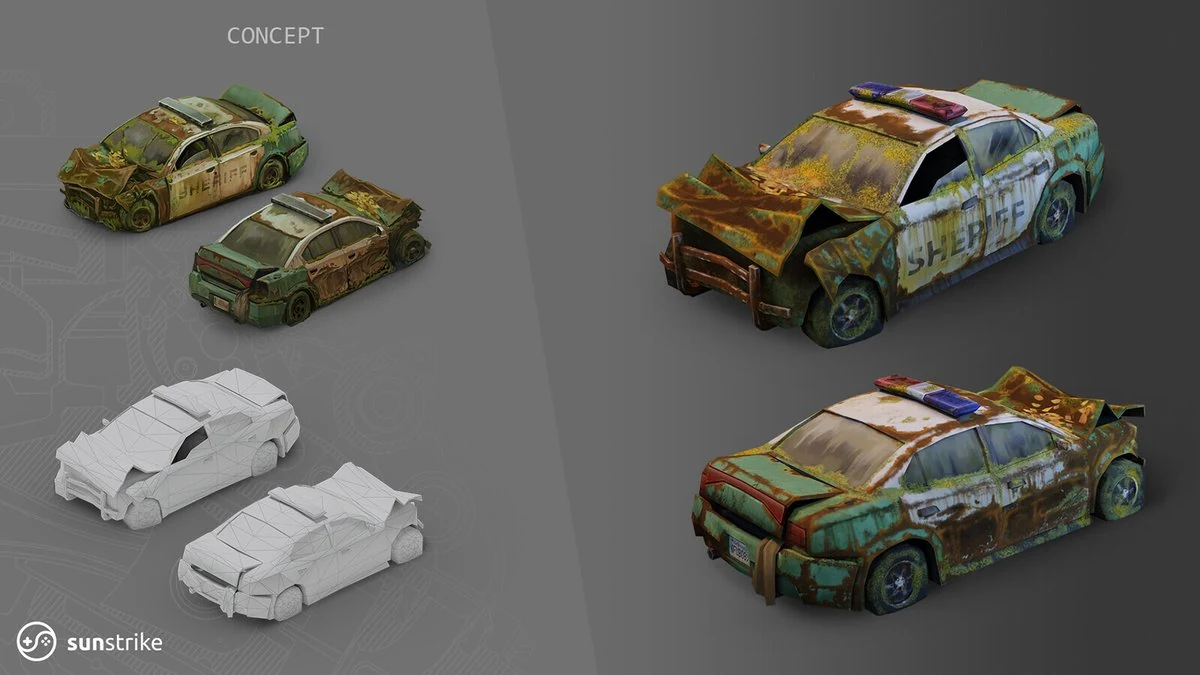
How SunStrike Studios delivers production-ready cars
SunStrike’s vehicle pipeline blends artistry with predictable engineering. Concept artists define stance and character aligned with your brand or fiction. Hard-surface modelers build clean, subdivision-friendly shells that bake without artifacts. Tech artists supply master shaders for paint, clear-coat, chrome, glass, rubber, and carbon fiber, along with atlases and export presets. Our texturing team grounds each car in PBR values and adds the right level of wear to tell your story. Engineers integrate the assets with correct pivots, colliders, and reflection capture logic. QA sweeps for reflection quality, LOD stability, shader variants, memory residency, and device-tier behavior so what dazzles in a staged render also holds up in gameplay.
Whether you need a single hero supercar, a stylized lineup for a mobile racer, licensed vehicles with multiple trims, or a traffic fleet that hits budget on low-end hardware, we can embed a pod into your project or deliver turnkey packs to your repository. Teams that need driver figures, garage crews, or branded mascots alongside their fleet can plug into our 3D character design services, while UI overlays, dashboards, and HUD elements can be commissioned as 2D game art. Track environments and showroom scenes are covered by our game backgrounds team.
A practical way to start today
Set the visual promise, compile clean references, and define camera distances and platform tiers. Block the entire body as a continuous shell until highlights glide, then separate panels and add details that support the silhouette. Build wheels as modular parts with sane pivots. Sculpt a high-poly where it pays off, retopo with even quads, unwrap with a consistent density, and bake to engine-matched maps. Author a car-paint shader with clear-coat and a believable flake response, and ground every material in physically plausible ranges. Create thoughtful LODs, wire up reflection probes, and profile in real scenes. Fold visual QA and performance QA into the same cadence so the car lands as planned.
If you want help locking this workflow or need an experienced team to take a concept from sketch to shipping asset, SunStrike Studios can jump in at any stage - art direction, modeling, materials, engine integration, and QA. Tell us your platform targets, art style, and timeline, and we’ll build a car pipeline that scales with your game and your audience.